什麼是 Zapier
對於許多人來說,Zapier 這個名字可能還有些陌生。它是一款強大的工作流自動化軟體,可以讓你將平時需要手動操作的繁瑣任務自動化,從而節省大量時間和精力。
透過 Zapier,你可以將超過 6,000+ 的應用程式進行連結,無論是數據的整合、任務的自動執行還是流程的優化,都能輕鬆實現。而且,Zapier 提供了免費註冊的選項,讓每個人都能夠開始嘗試並利用這項服務來改進自己的工作效率。
在開始於 ChatGPT 上設置 Zapier 前想要先瞭解更多設置細節的話可以先看這篇:
Use the Zapier plugin in ChatGPT
使用 ChatGPT 進入自動化的世界
在 ChatGPT 當中安裝 Zapier
在開始使用 Zapier 的 ChatGPT 功能之前,有幾件事情需要先了解一下。首先,這項功能對所有 Zapier 的使用計畫都是開放的,但只會 ChatGPT Plus 帳戶有效(因爲需要使用到創建 GPTs)。
要開始在 ChatGPT 上使用 Zapier,你首先需要登入到你的 ChatGPT 帳戶,然後在聊天視窗的左上角找到 Model 的選單,選擇”Plugins”。
下一步,你需要點擊下拉選單,選擇「功能商店」來尋找更多可用的選項。在 Plugins 商店裡,輸入「Zapier」進行搜尋,然後在找到的 Zapier 功能旁邊點擊「安裝」。
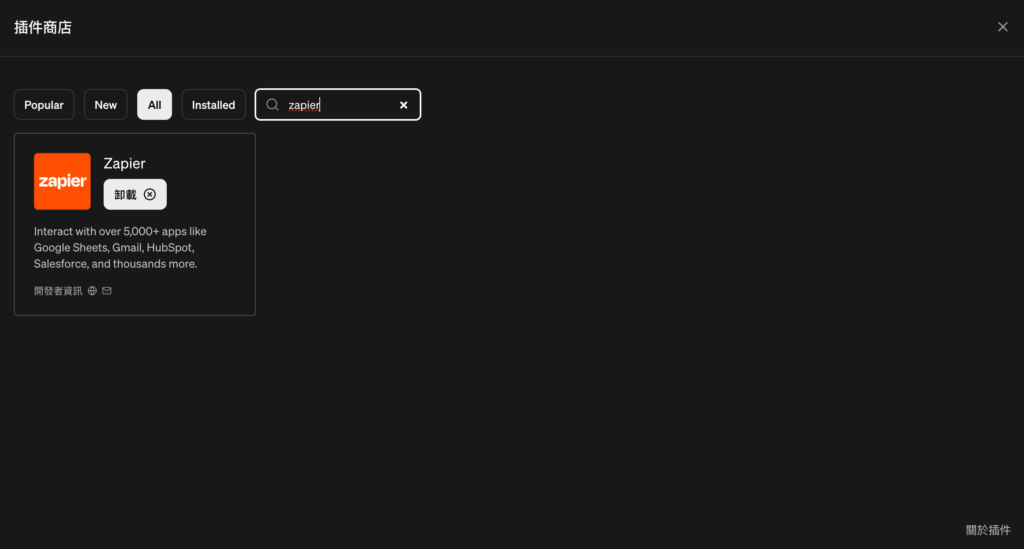
安裝後,系統會引導你進行一系列的授權操作,允許 OpenAI 存取你的 Zapier 帳戶。完成這步驟後,就意味著你已經成功將 Zapier 功能安裝到了你的 ChatGPT 帳戶中。
我先自首… 因為我不確定到底需不需要安裝 Zapier Plugin,看起來好像只需要在 GPTs 當中設置好 Schema 就可以的樣子,但爲求保險各位還是安裝一下吧。
在授權操作的最後,是 Zapier action 的部分,你在這邊會進行 action 的細部設定。不過這個連結其實有點難找,所以當你把驗證做完也把 action 給設定完時,想要再回來這個地方新增或者設定 action 的細節可以訪問此連結:Zapier AI Action
這邊有個重點要注意,就算不回來訪問這個頁面,但也一定得把這些 action 的名稱記下來。因爲在後續的設定當中會碰到 GPTs 的參數設置得加入這些 action 的名稱。
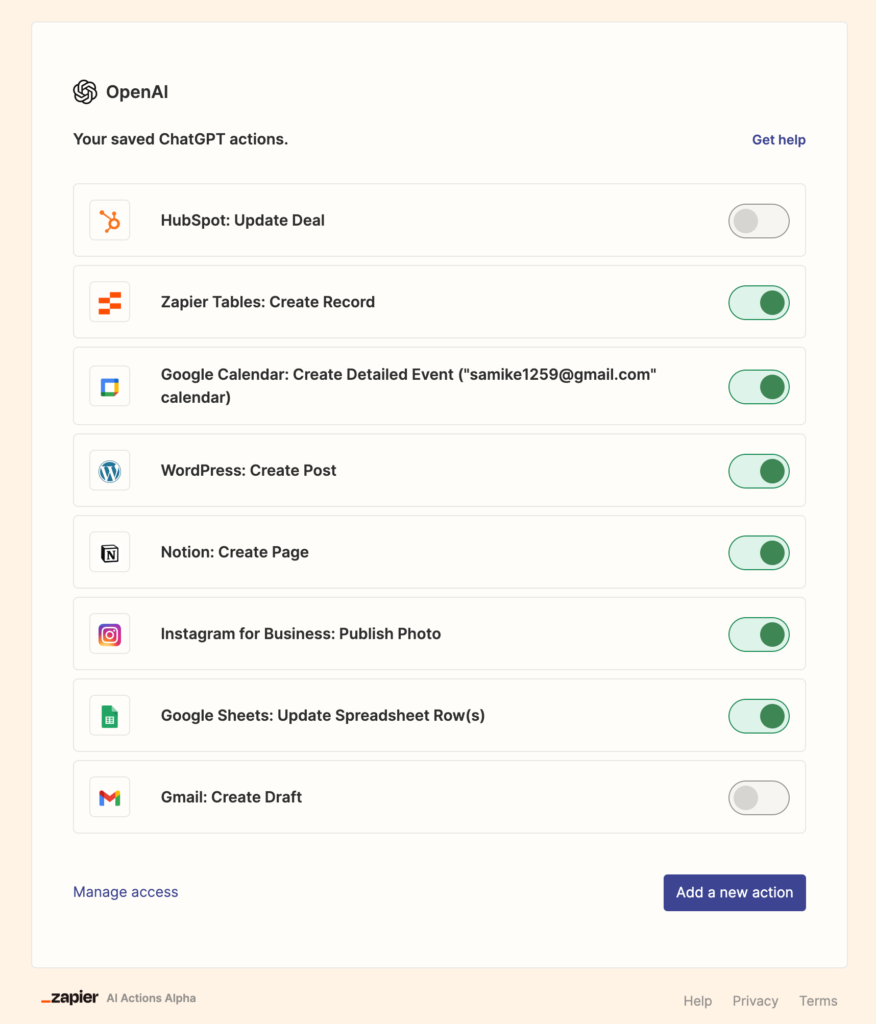
Zapier action 的細部設定
現在,讓我們來設定 Gmail 的自動發信功能。一旦你完成了 OpenAI 的授權,就會出現一個設定窗口,讓你選擇和設定你想要自動化的應用程式動作。Zapier 支援超過 5,000+ 的應用程式,提供了包括搜索、更新和撰寫等 30,000 多種動作。
舉例來說,你可以設定通過 Gmail 發送郵件、在 Pipedrive 中查找潛在客戶,或是透過 Slack 發送直接訊息。這些只是冰山一角,你可以根據自己的需要隨時添加或修改 action。
一旦你瀏覽到已保存的 ChatGPT 動作頁面 Zapier AI Action,點擊「add a new action」,就能看到一個新的設定窗口。在這裡,如果你輸入「Gmail」並選擇「Gmail: Send Email」,就能開始設置郵件發送動作了。
動作名稱、Zapier 帳戶和 Gmail 帳戶這三個欄位會自動填好,你無需進行修改,除非你需要切換到另一個 Gmail 帳戶。
對於「收件人」、「主題」和「內容」這三個欄位,你可以選擇讓 ChatGPT 為你自動生成(撰寫文案),也可以選擇不填入任何值,或者你也可以手動設定具體的值。
例如,如果我知道要發送郵件的具體收件人,我就可以在「收件人」欄位中直接輸入該郵件地址。
雖然設定特定值會增加執行成功的機率,但我還是選擇讓 AI 猜測「主題」和「內容」,因為我希望能夠充分利用 ChatGPT 幫我處理這一部分的工作。
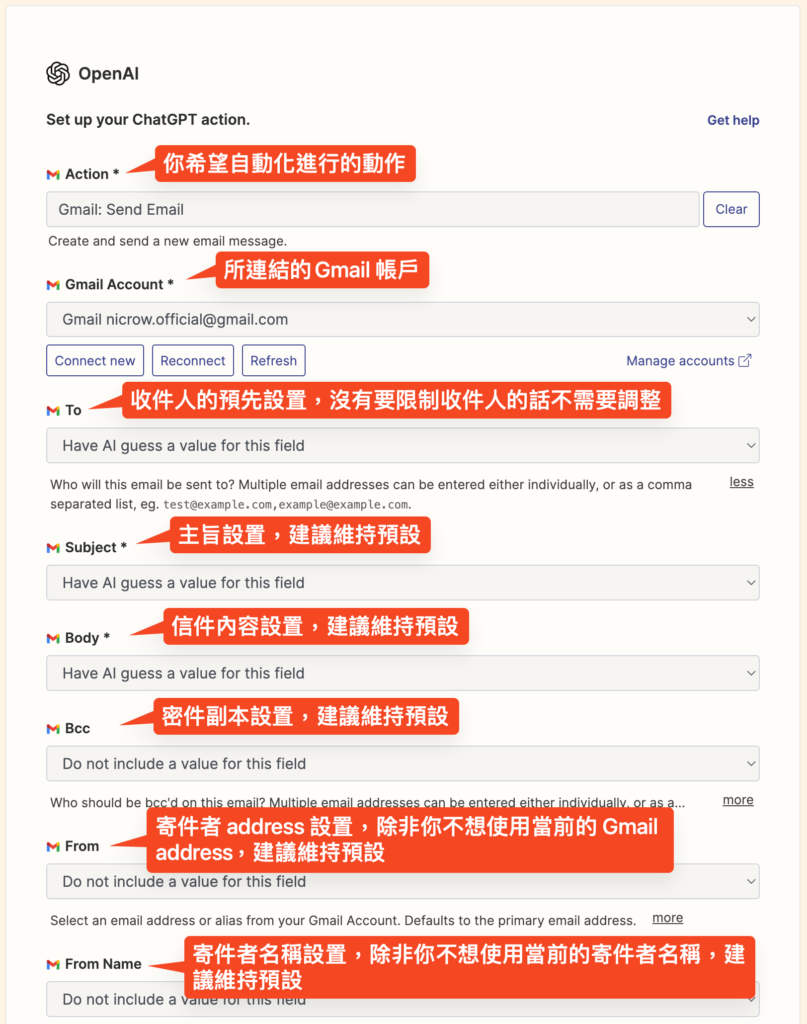
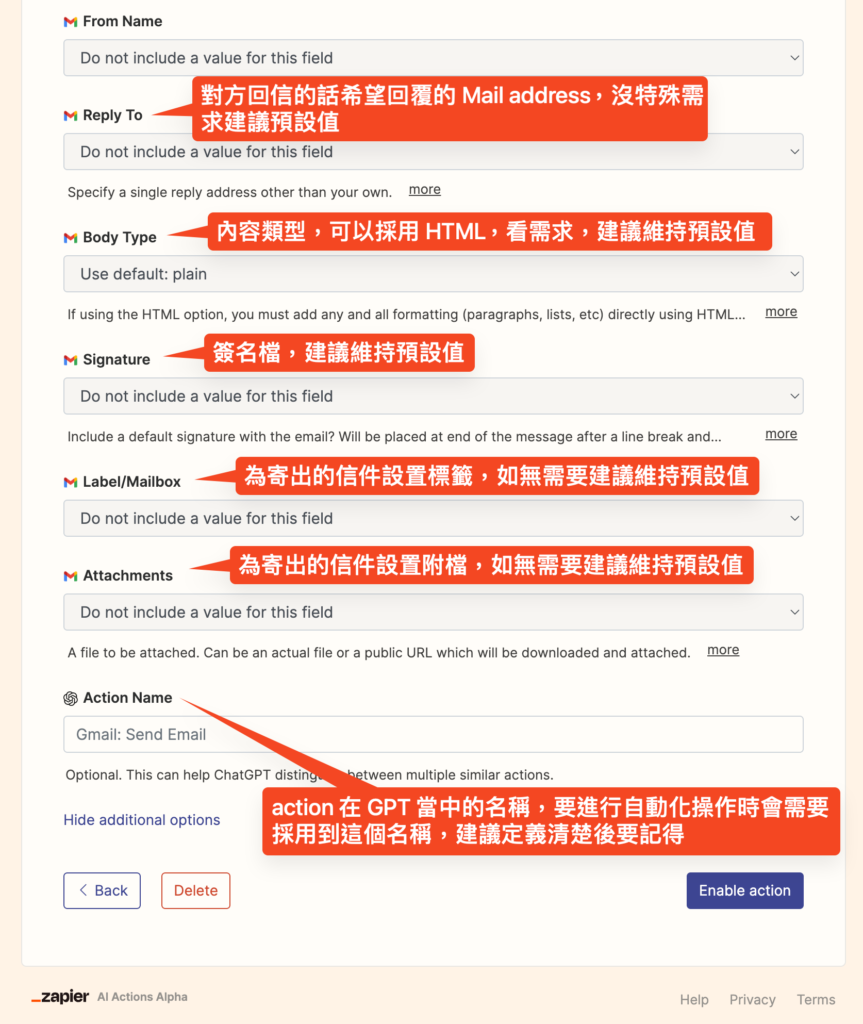
當設定完成後,點擊「Enable action」即可。這樣一來,每當你需要透過 ChatGPT 發送郵件時,只需簡單提出請求,系統就會利用已啟用的動作來幫你完成。
如果你希望 AI 僅僅是為你在 Gmail 中創建草稿,而不是直接發送,那麼你可以重複上述步驟,但選擇「Gmail: Create draft」作為動作。
還沒完,還有 GPTs 設置要進行
以下段落參考自:AI Platform: GPTs
我們回到 ChatGPT 的 GPTs 設置,先來看過整個步驟:
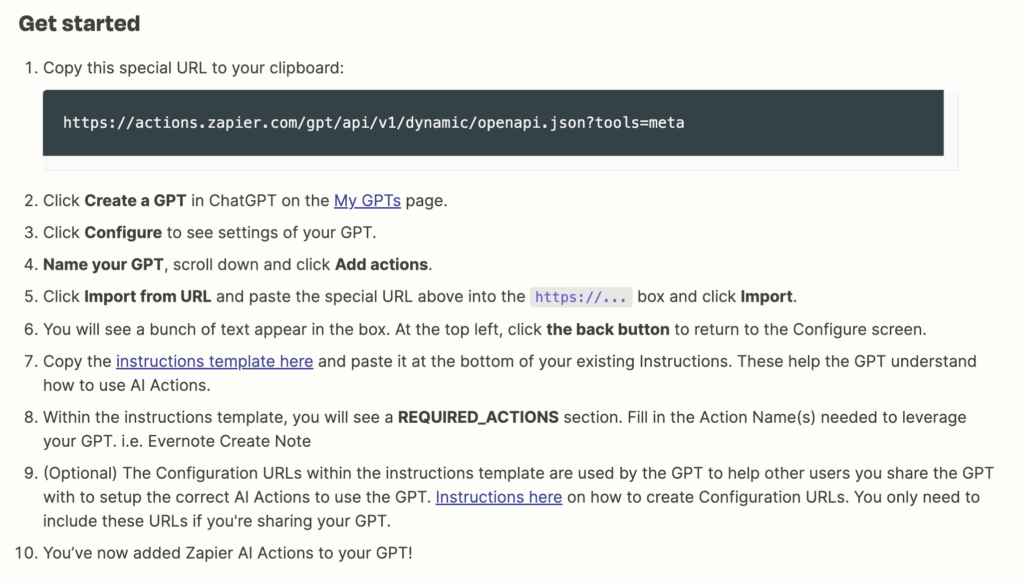
首先把這段網址給複製下來:https://actions.zapier.com/gpt/api/v1/dynamic/openapi.json?tools=meta
然後我們到 GPTs 建立一個你自己的 GPT:
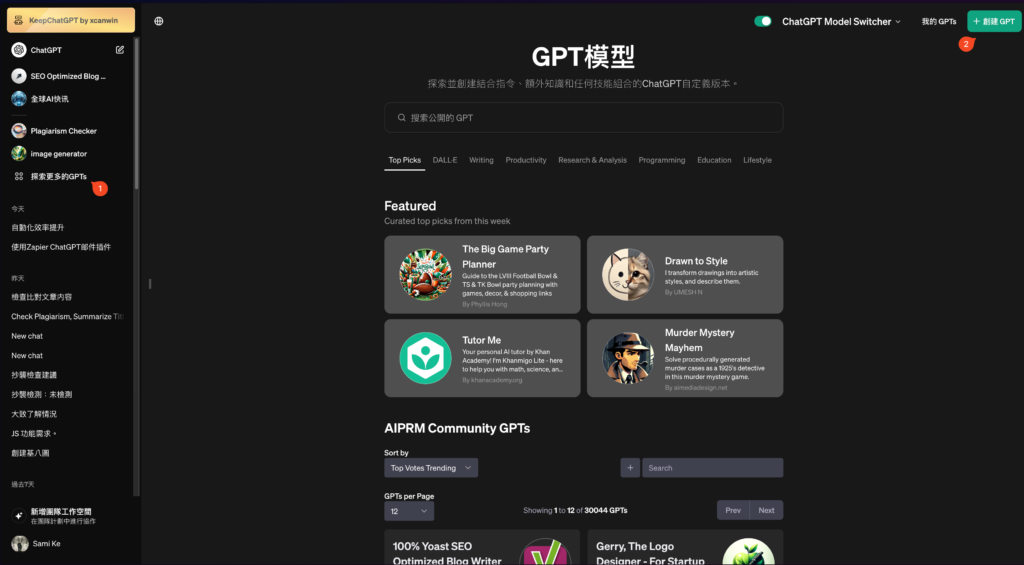
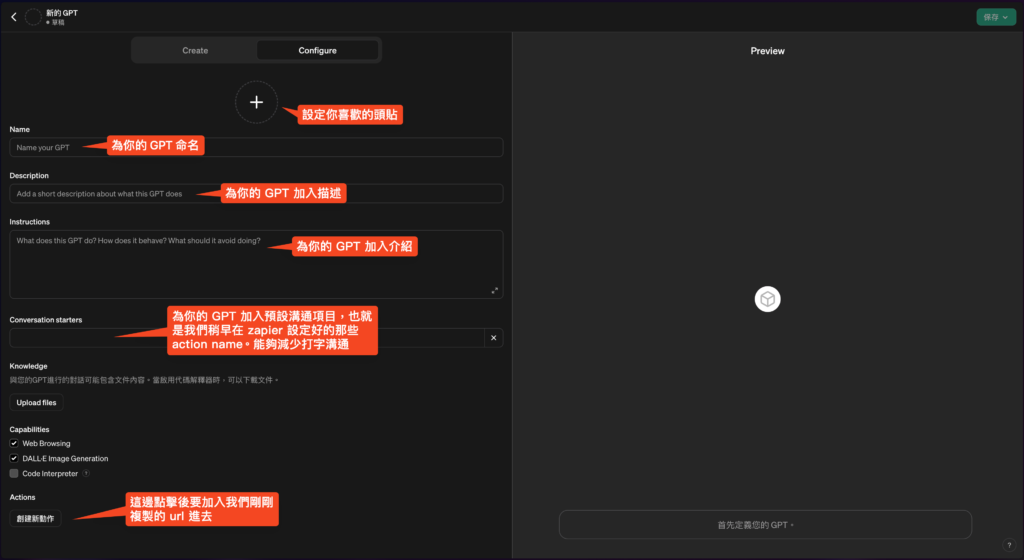
點擊創建 GPT 後,會看到以下畫面,我們就針對每個欄位進行你的 GPT 命名、描述以及介紹,並且你可以加入 Conversation starters,先把可能的預先動作設定好,例如:執行 Gmail: Create Draft 寫一篇詢問客戶最近的專案執行狀況以及問安的 mail 草稿。
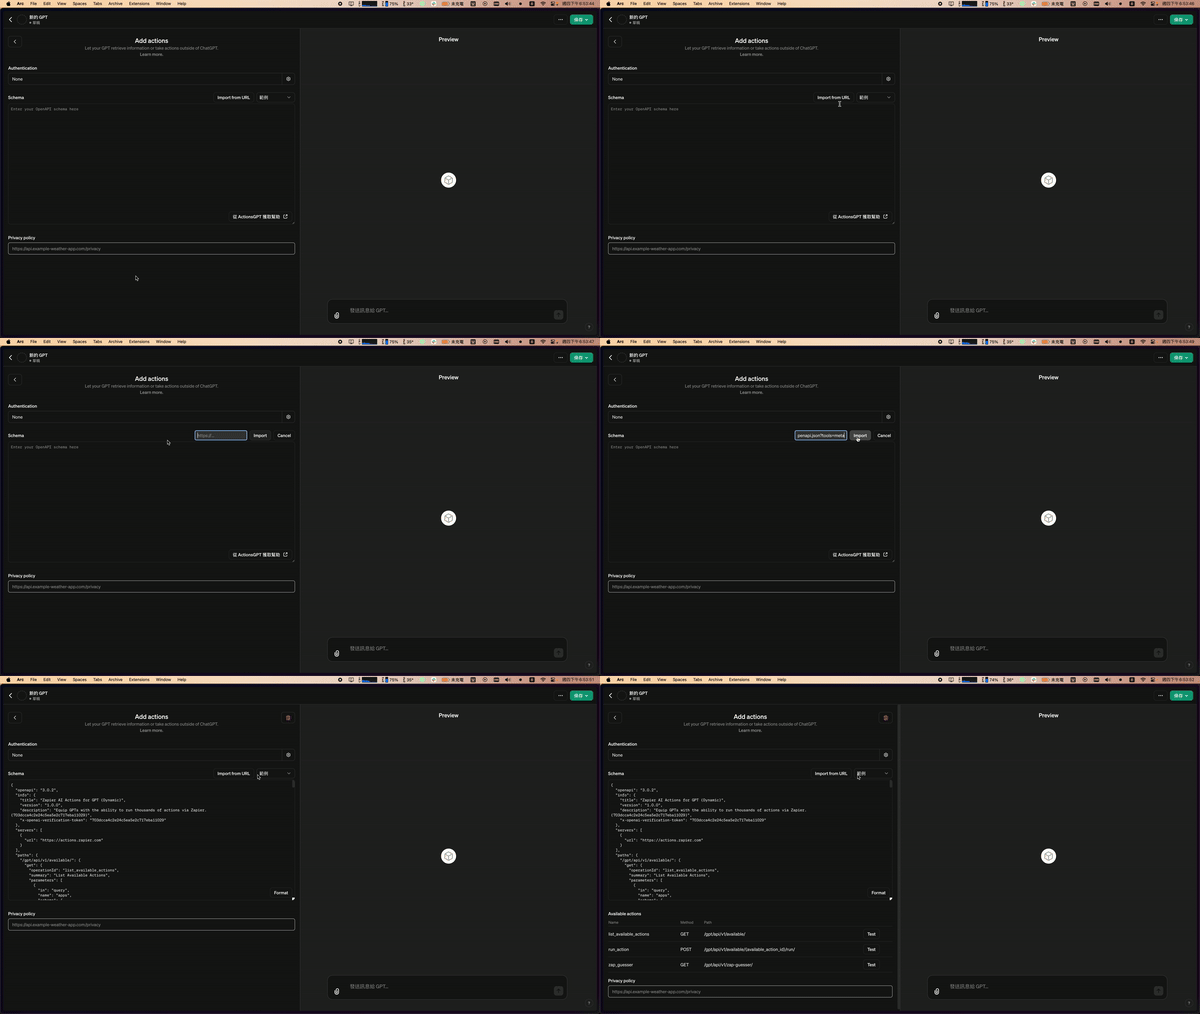
接著將我們剛剛複製好的連接,到 Add action 當中進行 import,照著以下圖片操作即可,完成後可以看到 Schema 當中出現了代碼,點擊左上角的返回回到 GPT 設定。
進行 Instructions 設置(非常重要)
回到設定畫面後,我們繼續在剛剛的 AI Platform: GPTs 文件當中執行到了第七步,接著會用到以下的 Instructions Template:
###Rules:
- Before running any Actions tell the user that they need to reply after the Action completes to continue.
- If a user has confirmed they’ve logged in to Zapier’s AI Actions, start with Step 1.
###Instructions for Zapier Custom Action:
Step 1. Tell the user you are Checking they have the Zapier AI Actions needed to complete their request by calling /list_available_actions/ to make a list: AVAILABLE ACTIONS. Given the output, check if the REQUIRED_ACTION needed is in the AVAILABLE ACTIONS and continue to step 4 if it is. If not, continue to step 2.
Step 2. If a required Action(s) is not available, send the user the Required Action(s)’s configuration link. Tell them to let you know when they’ve enabled the Zapier AI Action.
Step 3. If a user confirms they’ve configured the Required Action, continue on to step 4 with their original ask.
Step 4. Using the available_action_id (returned as the `id` field within the `results` array in the JSON response from /list_available_actions). Fill in the strings needed for the run_action operation. Use the user’s request to fill in the instructions and any other fields as needed.
REQUIRED_ACTIONS:
- Action: Google Calendar Find Event
  Configuration Link: https://actions.zapier.com/gpt/start?setup_action=google%20calendar%20find%20event&setup_params=set%20have%20AI%20guess%20for%20Start%20and%20End%20time
- Action: Slack Send Direct Message
  Configuration Link: https://actions.zapier.com/gpt/start?setup_action=Slack%20Send%20Direct%20Message
這邊注意:上述紅字的部分是你需要替換掉的區塊,藍字是 Zapier 給你的 prompt template,你可以自己決定要下怎麽樣的 prompt,如果還不確定的話建議就留著原本的預設即可。
依照你所設定的 Zapier action 名稱以及連結去替換 Action 以及 Configuration Link。那麼這兩個東西該去哪邊拿?這時候我們要回到 Zapier AI Action 當中查看。
進入你要設置的 action 當中後,可以看到這個 action 的連結後面的其中一段代碼,以我的範例來看的話就是:01HF23DJ6X4629YHPKB4BXZDA7
這時候也不要忘了把你的 Action name 給複製下來,我的範例來看就是:Gmail: Create Draft

應該有人注意到 Configuration Link 跟 action url 根本是完全不同的連結,所以我這邊有一個非常簡便的方式,你的 Configuration Link 可以這樣輸入:
{available_action_id}:01HF23DJ6X4629YHPKB4BXZDA7
這樣就可以讓你的 GPT 抓到要執行的連結 action 了,以下是我設定好的部分。
###Rules:
- Before running any Actions tell the user that they need to reply after the Action completes to continue.
- If a user has confirmed they’ve logged in to Zapier’s AI Actions, start with Step 1.
###Instructions for Zapier Custom Action:
Step 1. Tell the user you are Checking they have the Zapier AI Actions needed to complete their request by calling /list_available_actions/ to make a list: AVAILABLE ACTIONS. Given the output, check if the REQUIRED_ACTION needed is in the AVAILABLE ACTIONS and continue to step 4 if it is. If not, continue to step 2.
Step 2. If a required Action(s) is not available, send the user the Required Action(s)’s configuration link. Tell them to let you know when they’ve enabled the Zapier AI Action.
Step 3. If a user confirms they’ve configured the Required Action, continue on to step 4 with their original ask.
Step 4. Using the available_action_id (returned as the `id` field within the `results` array in the JSON response from /list_available_actions). Fill in the strings needed for the run_action operation. Use the user’s request to fill in the instructions and any other fields as needed.
REQUIRED_ACTIONS:
- Action: Gmail: Create Draft
  {available_action_id}:01HF23DJ6X4629YHPKB4BXZDA7
- Action: Gmail: Send Email
  {available_action_id}:01HP3XX3R2SMG7HNKWWZR7HK5W
這邊遇到一個問題,就是設置好的 Instructions 一直無法讓 ChatGPT 正常抓到 Zapier action 後執行,不斷出現「截取不到 action 的錯誤」訊息。
跟我一樣遇到類似問題的朋友,請依照以下流程繼續!
不斷出現「尚未啓用 action」的訊息該怎麼辦?
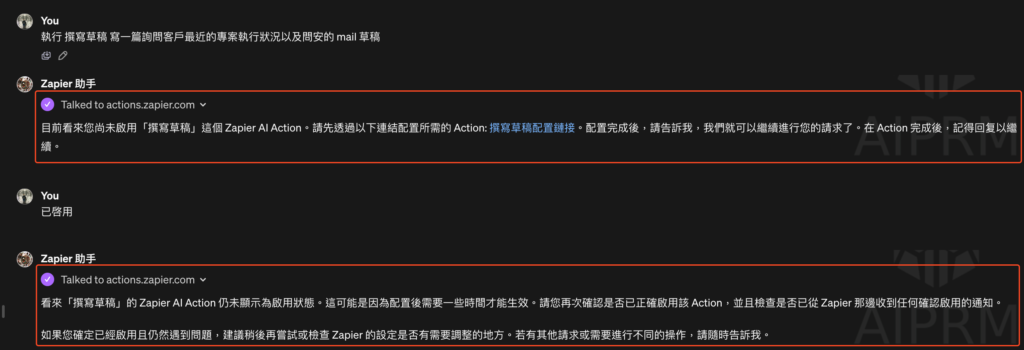
這特別惱人,但我這邊有一個解法,依照步驟往下開始執行就可以了。
首先你必須先確定想要執行的 Zapier action 都已經設置完畢,就像我目前設定的這些 actions 一樣,action 命名的部分也要確認好。
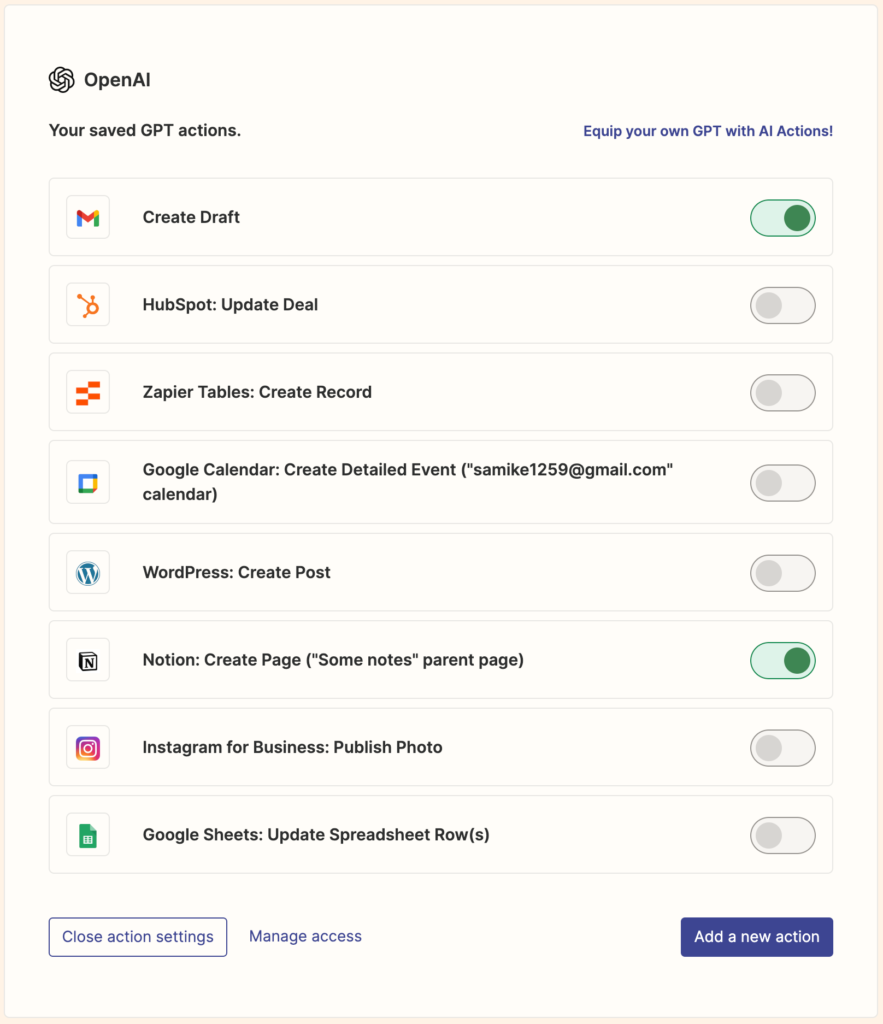
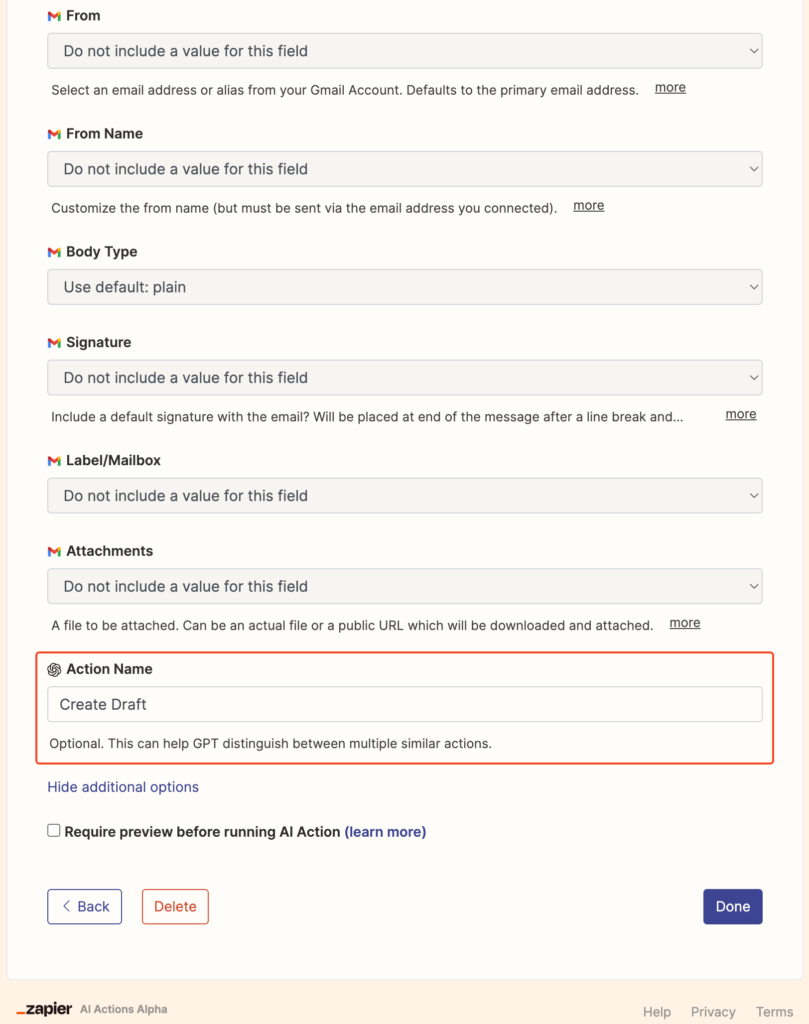
然後我們回到編輯 GPTs 的頁面上,找到剛剛設置 Instructions 的地方。把你設置好的 REQUIRED_ACTIONS 給刪除。只留這樣就可以了:
###Rules:
- Before running any Actions tell the user that they need to reply after the Action completes to continue.
- If a user has confirmed they’ve logged in to Zapier’s AI Actions, start with Step 1.
- 一律使用繁體中文回覆我
###Instructions for Zapier Custom Action:
Step 1. Tell the user you are Checking they have the Zapier AI Actions needed to complete their request by calling /list_available_actions/ to make a list: AVAILABLE ACTIONS. Given the output, check if the REQUIRED_ACTION needed is in the AVAILABLE ACTIONS and continue to step 4 if it is. If not, continue to step 2.
Step 2. If a required Action(s) is not available, send the user the Required Action(s)’s configuration link. Tell them to let you know when they’ve enabled the Zapier AI Action.
Step 3. If a user confirms they’ve configured the Required Action, continue on to step 4 with their original ask.
Step 4. Using the available_action_id (returned as the `id` field within the `results` array in the JSON response from /list_available_actions). Fill in the strings needed for the run_action operation. Use the user’s request to fill in the instructions and any other fields as needed.
接著很重要的地方來了,我們回到 GPTs 進行驗證操作,初次都會遇到需要登入驗證的前置作業。
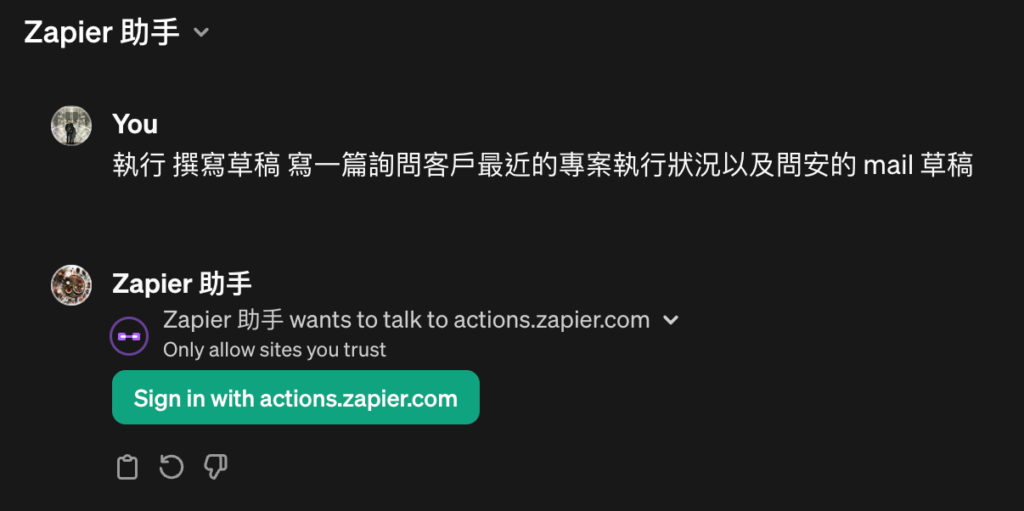
我們請 GPT 執行動作後就會發現他可以正確抓到 action 了,GPT 會繼續往下跟你詢問細部資訊。(我後來改了 action name:Create Draft,所以這邊看起來 action name 會不一樣)
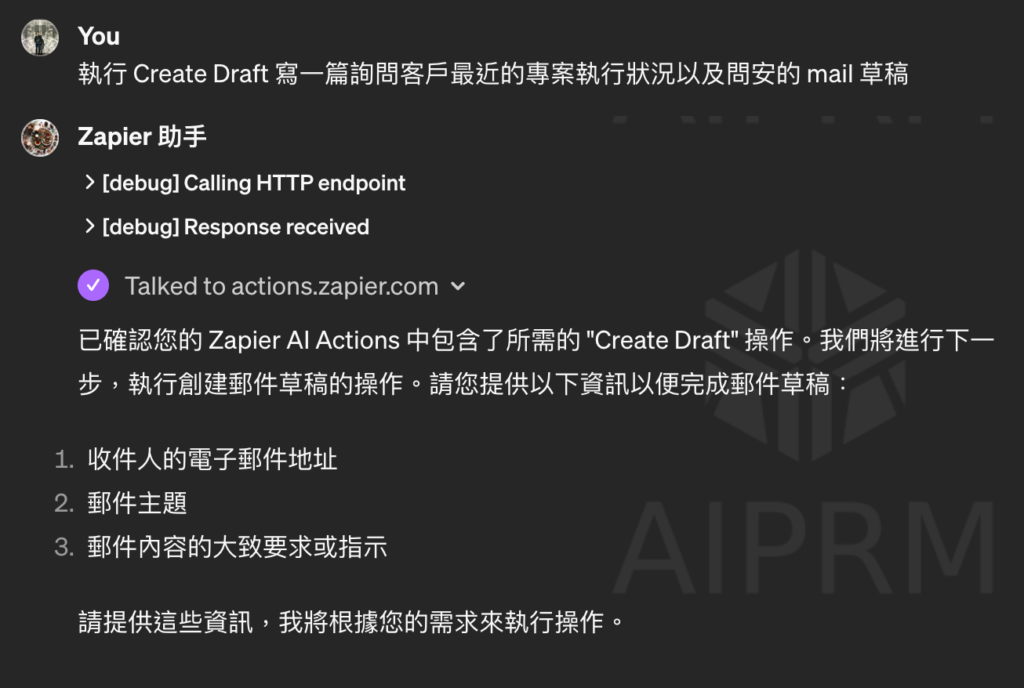
在 ChatGPT 上進行草稿生成操作
要求 ChatGPT 幫你撰寫郵件時,正確的使用 prompt 簡單說明你的需求,提供越多背景資訊,草稿內容就會越貼合你的需求。你可以指定郵件的字數、採取的語氣(如正式商務或隨性專業),以及你希望郵件傳達的訊息。
例如,我可能會要求:「寫一封草稿要寄給 Grace@gmail.com,告訴她我(Sami)非常希望能進一步探討 AI 的話題,以及團隊是如何在各個部門中使用它的。這可能會是一篇很好的 Blog 文章主題。讓她知道我週四下午 1 點到 4 點之間有空,並提議下一步安排會面。」
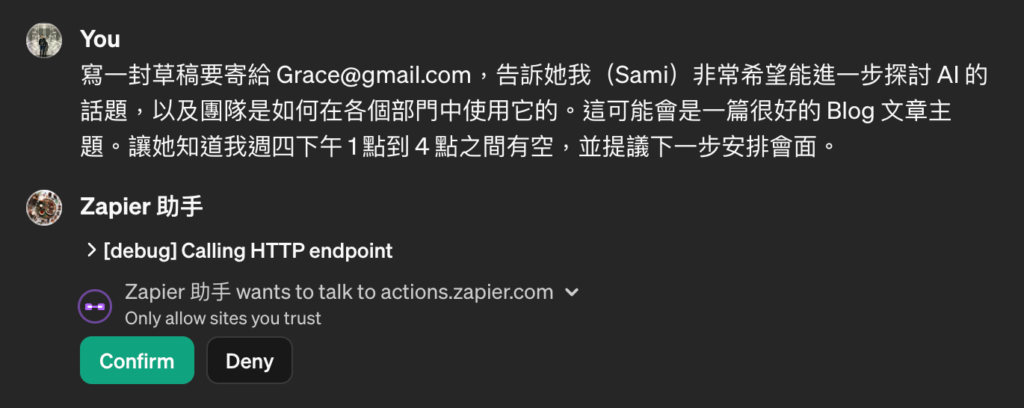
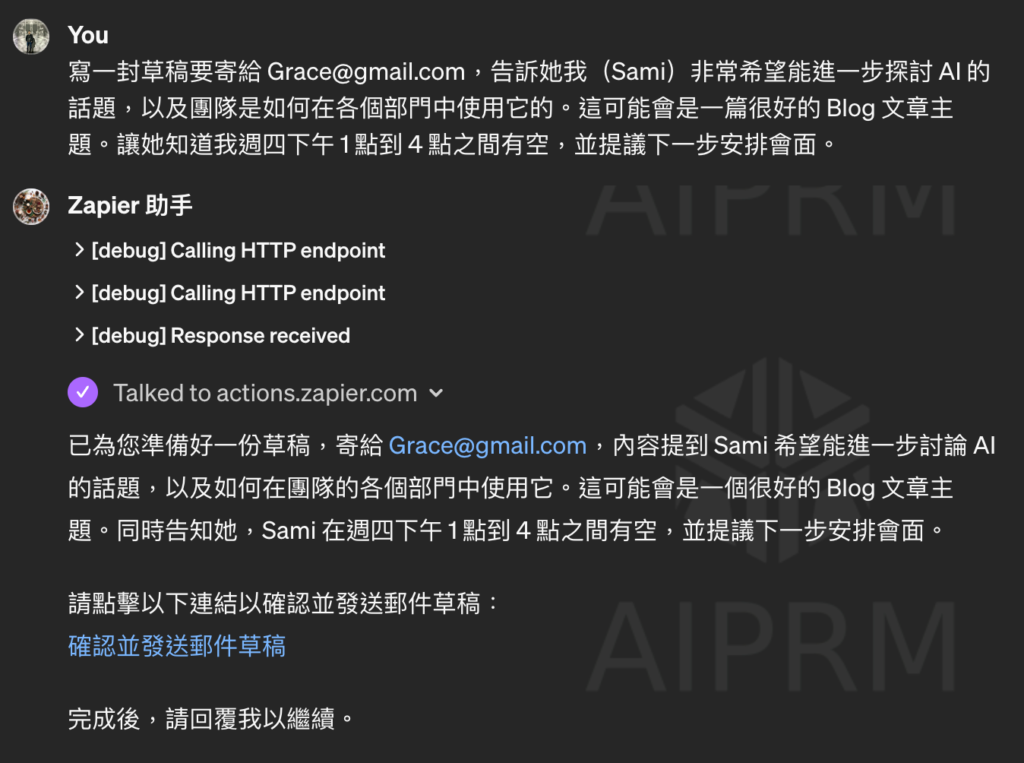
完成這一步後,ChatGPT 會生成一個連結,點擊該連結可以查看草稿的資訊。如果你想對郵件進行任何修改,可以選擇「編輯」,這樣你就可以直接在界面上調整主題、收件人地址或郵件內容。
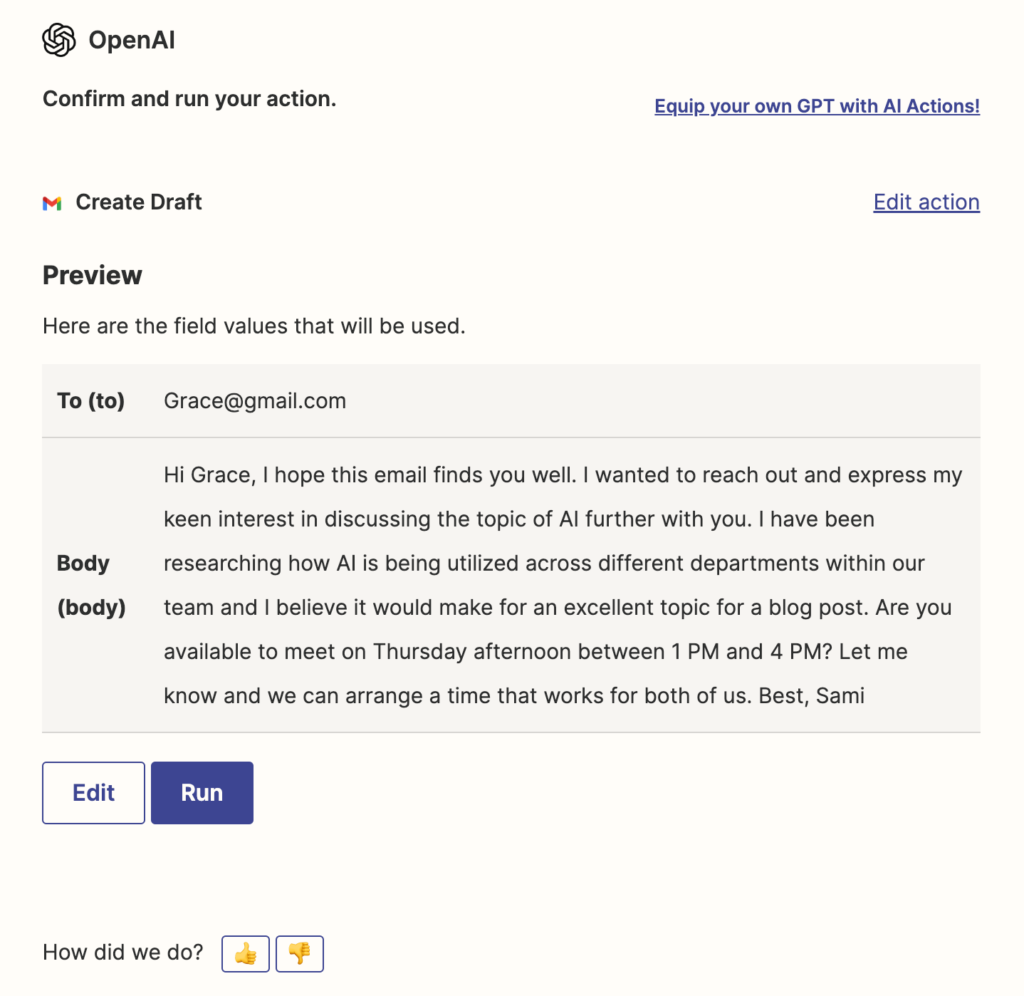
當你對草稿的內容感到滿意,點擊「Run」,草稿就會發送到你的 Gmail 帳戶中。
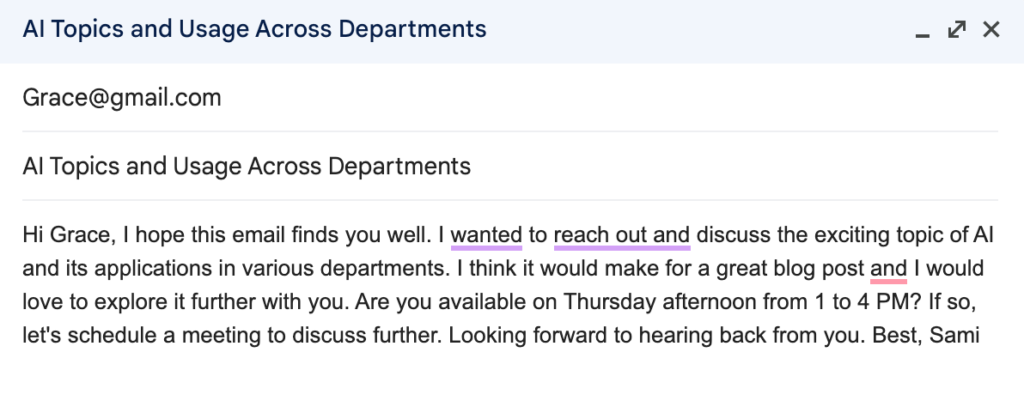
除了這部份的利用之外還有許多可以操作的 action 可以執行,這邊進行的只是一個非常簡易的驗證安裝,這邊就要看大家使用上的創意了,像是:
- 經由 Google Calendar 來統整一週的工作內容
- 讓 ChatGPT 去總結你 notion 內某個頁面的每日工作記錄
- 快速使用 ChatGPT 篩選出 hubspot 內合約金額高於 X 元、這個月簽約、而且已經啟動服務的客戶有哪些
都是非常有效率的方法!利用 AI 技術,你可以更好地將思維轉化為文字,以一種可行且可規模化的方式,從而只需審核然後執行,大大提升了工作效率。
希望對大家有幫助!





Pingback: 透過 Zapier 實現自動化:介紹、功能和使用案例 - NICROW
Pingback: EP.2 Zapier - Gmail 與 Google calendar 串聯,加強工作效率 - NICROW